Part I: Using Triton:
Description of Triton menus and functions
Triton main menu:
To run Triton type `triton' on the command line. This command initializes several
environment variables used by Triton, and opens a log file named triton.log. Triton
will write in this file messages for each operation performed
during the session. Note that these messages also appears in the control window (
from which you launched the triton command). Error messages are also written in
triton.log. To change the location and the name of the file triton.log see section "INSTALLATION".
Once these initializations are successfully performed, Triton displays the main
menu. First of all note the push button labelled "Help" on the bottom of this
menu (as in most of Triton menus): this allows you to view the in-line help
documentation. This "help" function needs a HTML browser. See section
"Installation" for more information.
Triton main menu is divided in four parts:
I.1. Selection of the active image
Up to six images can be simultaneously load into memory. The user must specify the
active image on which the treatment is processed. This is done by clicking on
one of the six toggle buttons on the top of the menu. The selected image button
appears as red. Each of these buttons is labelled with the number of the
corresponding image and a supplementary character specifying the nature of the
image. For instance:
 "Image 1 f" means memory number 1 contains an image in
direct space with pixels encoded as floating point numbers.
"Image 1 f" means memory number 1 contains an image in
direct space with pixels encoded as floating point numbers.
"Image 3 *" means memory number 3 contains an image in
Fourier space with pixels encoded as two floating point numbers for the real
and imaginary parts.
"Image 4 " without `f' or `*' means memory number 4 is
empty.
At the beginning of a Triton session all the memories are empty. The first
operation is to read an image from the disk and to load it in one of the six
memories. To increase the number of memories to load more images, edit the file
Triton/c/trn.h and set the variable MAX_IMG_NUMBER to the desired value. Then
recompile the program ( see section Compiling
Triton).
I.2. Input / Output operations:
I.2.1. Read and Write image. Available formats
Triton supports several image file formats: TIFF, PGM, GIF, PPM, LMCP and raw data format.
Note that Triton uses Pbmplus routines to convert image file in its own internal
format. If you do not have Pbmplus on your machine, Triton will still work but
LMCP, PGM and raw file formats only will be available.
I.2.1.1. Raw format:
In such a format pixel values are sequentially stored, line after line
without any other information. Therefore to read or write such an image file first
you must specify three parameters:
the number of pixels per line: this parameter corresponds
to the width of the image.
the number of lines: this parameter corresponds to
the height of the image.
the pixel encoding: pixel values may be encoded in
different ways. For raw files Triton allows three pixel formats:
 Byte format: each pixel value is encoded on one byte
( eight bits). Thus a pixel takes a integer value between 0 and 255.
Byte format: each pixel value is encoded on one byte
( eight bits). Thus a pixel takes a integer value between 0 and 255.
Floating point format: each pixel is encoded as a floating
point number (on four bytes typically).
Complex format: each pixel of the image represents
a complex number whose real and imaginary parts are encoded as two floating
point numbers.
I.2.1.2. TIFF format:
As for raw byte format, pixels are stored as integer values between 0 and 255.
But in Tiff format the number of lines and the number of pixels per line are
already stored in the file: you do not have to specify them to read the image.
TIFF automatically compresses the image to reduce the place on disks. This
operation does not alter the quality of the image.
I.2.1.3. PGM format:
Pixels are stored as integer values between 0 and 255. The number of lines and
the number of pixels per line are already stored in the file: you do not have
to specify them to read the image. There is no compression.
I.2.1.4. PPM format:
Images stored in this format are encoded in true colors. This means that pixels
are stored as three integer values, each one between 0 and 255. The first one
corresponds to the Red component, the second one to the Green component and the
last one to the Blue component. The number of lines and the number of pixels
per line are already stored in the file: you do not have to specify them to
read the image. There is no compression.
Note that Triton supports this format for read operation only: it converts the
colored image in grey scale. You can not write images in PPM format.
I.2.1.5. LMCP image file format:
Using LMCP format, one may associate different information about the image,
such as:
title: this field may contain a title or a comment about
the image. It must be less than 256 characters.
date: you may associate a date to the image. If you do
not specify any date Triton takes the current date.
width: the number of pixels per line in the image.
height: the number of lines in the image.
statistics: if statistical data have been previously
calculated Triton keeps this information in the image header.
real sizes: these fields may contain the actual width
and height of the physical image together with their unit. They are stored
as character strings.
In LMCP format pixel values may be encoded as bytes or floating point
numbers (float) or complex (see section Raw Format).
All these informations are encoded in the image header which may be
viewed and modified using the View / Modify header
menu.
I.2.1.6. Read image:
To read an image in a raw file format (see section Raw Format) you have to
specify first the pixel encoding ( "byte", "float", or "complex"), the width (
i.e. the number of pixels per line of image), and the height (i.e. the number
of lines in the image). To set correctly these specifications use the input
fields on the top of the "Read" menu:
The other formats ( i.e. TIFF, PGM, PPM, and LMCP) are automatically
recognized by Triton: select "automatic" file format at the top of the "read"
menu.
Once the image format is specified, select the name of the image file and click
on "OK".
I.2.1.7. Write image:
You have to select the format in the pulldown list on the top of the window.
See section Read/Write for a description of the different formats.
You may also write the image in PostScript format clicking on the "EPS" button.
The generated file may be sent later to a printer supporting PostScript format.
Note that this format is not readable by Triton.
Be careful: selecting floating point pixel format takes a large amount of place
on disk (1Megabyte for a 512x512 image). In most cases select byte pixel
format. In this case pixel values are renormalized between 0 and 255: the loss
of information is negligible( and the gain of disk memory is large!).
To save supplementary information together with the image, select the LMCP file
format: the image header will be written in the image file. You may modify the
current contents of the header before writting the image: click on the button
labelled "Modify image header". The current header of the image is then
displayed. When modifications are done, validate the changes clicking on
"Update header".
Once you have specified a format select a file name or type it in the
"Selection" field. Once this is done validate the operation with the "OK" push
button. A message in the control window tells you if the write operation has
been successfully completed.
I.2.2.View / Modify image header:
Triton associates an internal header to each image in memory. This header
contains different information about the image: a title, a date, real sizes and
statistical data (see section LMCP format). The menu "View/Modify header" allows
you to view the current information in the header of the selected image. You
may modify or add missing information clicking on the corresponding field in
the header menu:
If you read an image from a LMCP file, its header is automatically initialized
with the information stored in the file. If you write an image in LMCP format,
the internal header is copied in the LMCP file.
For a complete description of the header see section LMCP format.
I.2.3. Display image:
Once an image is load into memory click on the "Display image" push button to
display it. The image is automatically renormalized to be displayed with the
best dynamic of grey levels; note that this normalization does not change the
actual pixel values of the image in memory.
When the first image is displayed, a window labelled "color map" appears
which allows you to
modify the current color map.
This window contains two sliders, called "color
contrast" and "color shift". You may enhance the visual quality of the display
fitting these parameters for the displayed image. This operation does not
modify the actual pixel values in the memory. This "color map" window contains
three toogle buttons: you may select a grey color map or a pseudo-color map. To
invert the current color map, click on the "Invert color map" button.
For an image in direct space the origin is at the upper left corner of the
image. The coordinates and the value of a pixel appears at the bottom of the
window. For an image in Fourier space the origin of dual space is in the center
of the image. The displayed image represents in fact the logarithm of the
modulus of the true image in memory in order to enhance the visibility of the
high frequency components. It does not modify the actual image in memory.
Each image window contains a menu bar:
I.2.3.1. Display:
I.2.3.1.1. Print Image
You may print the image using this menu: a dialog window asks you for the
PostScript printer name:
The image is printed together with a description text
established from the values of internal image header ( see section
"View/Modify header ).
I.2.3.1.2. View image header
This option displays the current header of the image. The information contained
in this header are used when printing or writting ( with LMCP file format)
images. You may modify it from this menu before printing or saving the
image.
I.2.3.1.3. Close
This operation close the window of the displayed image, which is still in
memory.
I.2.3.2. "Profiles" analysis:
To view horizontal or vertical profiles in the image, select the profile option
and click on one point in the image. A new window is created, containing the
profile passing through the selected point:
For oblique profiles you have to specify two points in the image; click on the
first point, move to the second point and click on it. The profile is then
displayed in a new window.
The maximum and the minimum along the profile are indicated on the upper left
side of the profile window. One know the pixel values along the profile
using the slider in the profile window. The coordinates of the current point
are given together with the pixel value.
The profile may be saved in a file. Click on the button labelled "Write
profile": a new menu allows to save either the (X,Y) values or the Y
coordinates only in a ASCII file. This is intended for users who
want to plot a profile for publication using a graphic tool such as
xmgr, Kaleidagraph...
I.2.3.3. "Zoom" operation:
To magnify a particular area of the image, first select the zoom value. Then
click on a point in the image; a new window displays the magnified area;
if you click on another point in the image, the magnified area is
automatically updated.
The magnification is obtained by repeating the pixels in the image; no
interpolation is performed.
This submenu allows you to choose the value for the magnifying operation
between 2 and 6.
I.2.3.4. "Statistics":
Histogram: this function calculates and displays in a new window the pixel
values distribution.
Statistics: this function calculates and displays in the control window
statistical data: minimum, maximum, mean, root mean square over the whole
image.
I.3. Image treatments
Warning: in all subsequent operations the value of the pixels are modified.
Thus the original image is lost. It may be advisable to duplicate an image in
another memory before starting any treatment to be able to come back to the
original image in case of an error.
I.3.1. 3x3 Convolution:
This function performs the convolution of the image by a 3x3 matrix, denoted
(aij). Each pixel pnew(i,j) of the new image is defined as:

where pold(i,j) denotes the original value of the pixel at the location
(i,j).
The nine akl coefficients appear at the center of the "conv3x3" window and may
be manually modified. Classical operators have been introduced. Just click on
the operator name in the "conv3x3" window: the coefficients are automatically
set to their right values. Sobel operators perform numerical differentiation of
the image in particular directions, Laplacian operator may be used for edge
detection, the smoothing operator performs a pixel averaging over a close
neighbouring of each pixel.
After selecting the coefficients, execute the convolution by clicking on the
"exec" button.
I.3.2. Geometric operations:
These operations are available for real images only, not for images in Fourier
space.
Top-Bottom inversion: this function performs a symmetry
operation with a horizontal axis in the middle of the image. Thus the top and
the bottom of the image are exchanged.
Right-Left inversion: this function performs a symmetry
operation with a vertical axis in the middle of the image. Thus the right
and the left sides of the image are exchanged.
Image Translation: this function performs a translation
of the image. The translation vector coordinates may be defined manually in
the "x transl" and "y transl" input fields. Note that there is an optional
parameter called "periodic space" to perform a "cyclic" translation: what
will disappear at an edge of the image will reappear at the opposite edge.
Resize Image: this operation modifies the width and
the height of the image according to the values given in the "New width" and
"New height" input fields. The new pixel values are calculated using linear
interpolation. By convention the sum of all the pixel values will not be modified.
Extraction of a sub-image: to extract a rectangular
sub-image you have to give the coordinates of the upper left corner and the
lower right corner of the sub-image. Validate the operation clicking on "Do
Extraction". This sub-image replaces in memory the image from which it has
been extracted.
I.3.3. Fourier transform:
For images in direct space this function performs the Fourier transform of
the image, using the Cooley algorithm. The width and the height of the image
must be a power of two. The result is an image in Fourier space. One may then
use dual filters to analyse or enhance it. ( see section Frequential filters about dual filters).
For images in Fourier space this function performs automatically the inverse
Fourier transform. The result is an image in direct space.
Note: this operator may take a rather long time when using lowed workstation.
I.3.4. Wavelet analysis
This menu provides two methods to de-noise an image, i.e. to remove
the noise blurring the image. Both methods require that the noise is
a white ( uncorrelated) gaussian noise. If this is not the case,
you may apply a transformation to the image, such as the Anscomb
transform for Poissonian noises, before processing the image.
You have also to specify ( or give an estimation) of the noise root mean square.
The algorithm based on orthonormal wavelets is much faster than
the multiresolutions algorithm.
Orthogonal Wavelets:
Two functions are provided to perform noise reduction using
orthonormal wavelets:
Direct Wavelet Transform:
The original image is in the "direct space". Before applying the
denoising function, one has to decompose the image in the wavelet space.
Click on the button labelled "Direct Wavelet Transform" to do so.
The image is then decomposed on a basis of wavelets. The decomposition
algorithm uses the Daubechie's wavelets on 5 points.
To recompose the image ( i.e. to come back in the direct space), one
has to click on the button labelled "Inverse Wavelet Transform".
Wavelet de-noising:
The aim of this function is to removed most of the noise on the image.
One has to specify the root mean square of the noise; in most cases
this value is not available: the only way to achieve the treatment is to
try several values and to keep the best result according to the
expected de-noised image.
IMPORTANT:
Once the denoising function has been used, the
image must be recomposed to get the result in direct space: click
on the button labelled "Inverse Wavelet Transform".
MultiResolution Denoising:
This function is intended to reduce the effect of noise in an image. From
this point of view it is similar to Wiener filtering.
This method consists in decomposing the image I to
be denoised in a serie of sub-images I(n) of coarser and coaser resolutions:
the sub-image ( or plane) I(n) contains all the features which sizes are
about 2**n pixels.
One recomposes the image I by adding all the planes I(n).
The maximum number of planes depends on the image width W: for W=2**N, one
may build N planes.
Number of planes used for the noise reduction:
The image I being blurred by noise, this noise propagates through each
plane I(n); but one may prove that the planes I(n) corresponding to coarse
resolutions are not much affected by noise: the noise reduction is to be
processed on the finest planes only, typically for n=0 to 3.
Noise r.m.s.:
This parameter represents the root mean square ( or noise level)of the noise
blurring the image. It is used to process the selection of significant
information from the noisy image.
Denoising function
A pixel value lower than the noise level contains less statistically
significant information than a pixel value greater than the noise level.
Weighting pixels according to their information contents allows to
keep the significant information only.
Two methods may be used to perform the selection between significant and
unreliable pixels:
Threshold:
This function simply discards the pixels which values are lower than the noise
level. Most of the noise is hence removed, but some relevant details in the
image may be lost due to this very strong criterium.
Optimum:
This function is intended to keep more relevant details than the "threshold"
function. The applied criterium is therefore less selective than the "threshold"
function and the resulting image may be less "denoised".
One can not choose 'a priori' the right function to denoise an image: users
should try both of them.
Threshold coefficient:
One may adjust the denoising efficiency of the algorithm using the threshold coefficient:
for large threshold values ( above 5.0) most of the noise is removed but small
details in the image are also lost. Experience shows that the least
compromising threshold coefficient values are about 2.
Number of iterations:
The denoising algorithm is much more efficient when iterating the denoising
process. Typically the algorithm converges after 3 iterations. More iterations
do not change many details in the image and would only increase the
processing time!
Once you have specified these parameters, run the denoising operation by
clicking on the button labelled " Iterative Denoising".
Note: the processing time may be rather long on some lowed workstations.
I.3.5. Operations on two images:
This menu provides several operations requiring two images as input, called
"source image" and "destination image"; the output result is stored in the
image called "destination image". The two input images must have the same
widths and the same heights. To perform one of these operations you have to:
- select the first image ("Destination image") clicking on the corresponding
toggle buttons at the
top of the menu. Warning: this image will contain the result of the operation:
its previous contents are definitely lost.
- select the operation to be processed.
- select the second input image ("Source image") with the toggle buttons on the
bottom of the menu. The operation will not modify this image.
- Click on the "Exec" push button to execute the operation.
Available operations:
"dest = src": copies the source image into the destination
image.
"dest = dest + src": adds the source image to the destination
image.
"dest = dest - src": subtracts the source image from
the destination image.
"dest = dest * src": multiplies the destination image
by the source image.
"dest = dest / src": divides the destination image
by the source image (which must not contain any pixel value to 0).
"dest = dest + src - dest * src": this function performs
a logical sum on two images each one being normalized between 0 and 1. The
result is automatically normalized between 0 and 1. This operation is intended
to create a composite filter adding several normalized filters: the resulting
filter is still normalized between 0 and 1.
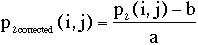
"dest = dest adjust src": It is intended to adjust
the contrast of two images. This is necessary to perform a precise comparison
( by subtraction) of the two images. One assumes that the relation between
the pixel values is to be linear:
p2(i,j) = a . p1(i,j) + b
where p1(i,j) is the pixel value at the location (i,j) in the source image, and
p2(i,j) is the pixel value at the same location in the destination image, to be
adjusted. One obtains the coefficients a and b computing the means m1 and m2,
and the root mean square s1 and s2 of the pixels values for the two images:

and b = m2 - m1
Then one corrects the pixel values of the second image:
I.3.6. Arithmetic operations:
This submenu provides some useful operations on images. For images in direct
space the following operations are available:
Add constant: this function modifies the pixel value
p(i,j) according to the rule:
p(i,j) = p(i,j) + constant
Subtract constant: this function modifies the
pixel value p(i,j) according to the rule:
p(i,j) = p(i,j) - constant
Multiply by constant: this function modifies
the pixel value p(i,j) according to the rule:
p(i,j) = p(i,j) * constant
Divide by constant: this function modifies the
pixel value p(i,j) according to the rule:
p(i,j) = p(i,j) / constant
If constant = 0, the operation is not processed.
Rehauss to constant: this function modifies
the pixel value p(i,j) according to the rule:
p(i,j) = max( p(i,j), constant)
Limit to constant: this function modifies the
pixel value p(i,j) according to the rule:
p(i,j) = min( p(i,j), constant)
In all these operations the constant value must be set manually in the field
labelled "constant" in the top of the window.
Log: this function modifies the pixel value
p(i,j) according to the rule:
p(i,j) = Log[ p(i,j) ]
If p(i,j) <= 0 the operation is not processed.
Exp: this function modifies the pixel value
p(i,j) according to the rule:
p(i,j) = exp[ p(i,j) ]
p(i,j) must be lower than 50 to avoid overflow.
SQRT: this function modifies the pixel value
p(i,j) according to the rule:

Erosion: this operation corresponds to the classical
morphological operator called erosion. It modifies the pixel value p(i,j)
according to the rule:
p(i,j) = maximum value of p(k,l) , for all (k,l) such that the distance
(k,l)-(i,j) is lower than r. You specify the value of the radius r in the field
"Constant".
Dilatation: this operation corresponds to the
classical morphological operator called dilatation. It modifies the pixel
value p(i,j) according to the rule:
p(i,j) = minimum value of p(k,l) for all (k,l) such that the distance
(k,l)-(i,j) is lower than r. You specify the value of the radius r in the field
"Constant".
For images in Fourier space the following operations are available:
Add constant: this function modifies the pixel value
p(i,j) according to the rule:
p(i,j) = p(i,j) + constant
Subtract constant: this function modifies the
pixel value p(i,j) according to the rule:
p(i,j) = p(i,j) - constant
Multiply by constant: this function modifies
the pixel value p(i,j) according to the rule:
p(i,j) = p(i,j) * constant
Divide by constant: this function modifies the
pixel value p(i,j) according to the rule:
p(i,j) = p(i,j) / constant
If constant = 0 the operation is not processed.
In all these operations the constant value must be set manually in the field
labelled "constant" in the top of the window. It can take only real values
(without imaginary part).
SQRT: this function modifies the pixel value p(i,j)
according to the rule:

CMPLEX conjugate: this function modifies the
pixel value p(i,j) according to the rule:
p(i,j) = Real part of p(i,j) - Imaginary part of p(i,j)
Real part: this function modifies the pixel
value p(i,j) according to the rule:
p(i,j) = Real part of p(i,j)
Imaginary part: this function modifies the pixel
value p(i,j) according to the rule:
p(i,j) = Imaginary part of p(i,j)
Wiener filtering: this function is used to increase
the signal to noise ratio. Each Fourier component is modified according to
the rule:
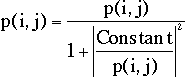
In this formula remember that p(i,j) represents a complex number.
The value of the constant, representing the noise amplitude in Fourier space,
must be specified in the "Constant" field of the menu.
I.3.7. Histogram equalization
This function equalizes the density of grey levels in the image: the number of
pixels per grey level is the same for all the grey levels. This is a good means
to enhance the contrast of an image.
I.4. Filter creation:
Triton allows to build two kinds of filters: direct filters, which are to be
applied on images in direct space, and frequential filters, to be applied on images in
Fourier space.
I.4.1. Frequential filters:
Unique frequential filters:
Frequential filters( also called dual filters) are used in Triton to
select a restricted elliptical area of the
Fourier transform of an image. Note that these filters are hermitian, i.e. they
are centro-symmetric to preserve the consistency of the filtering.
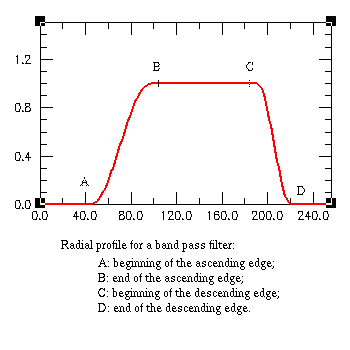
Such filters are defined by several parameters:
the coordonates (x,y) of its center, in pixels: the filter
may be placed anywhere in dual space. The origin is at the center of the image
when displayed, as explained in section
Once you have specified these parameters click on the button "Build filter" at
the bottom of the filter menu: this validates the parameters and processes the
filter. The result is stored in the current selected image (its previous
content is lost).
The button "Reset parameters" sets automatically the parameters to build a
circular low cut filter used for background equalization.
Periodic frequential filters:
An image may contain in its Fourier transform several peaks equally spaced,
corresponding to a two dimensional lattice. We have designed periodic filters
which allow you to select or remove easily only these peaks. To build such a
filter specify the coordinates (X1, Y1) and (X2, Y2) of the two vectors
generating the lattice, and define the shape of the filter which will be
located on each peak. The parameters to define this profile are the same as in
"unique dual filter": A and B specify the position of the ascending edge of the
filter, and C and D specify the descending edge. Be careful: the great axis is
limited by the translation vector. This means that D has a limit value depending
on the translation vectors. Once you have entered these vectors, click
on the button
"0<=A<=B<=C<=D<..." to update this limit value.
I.4.2. Direct filters
Circular direct filters:
These filters are defined by the same parameters as "unique dual filters" but
are applied to images in direct space. You have to specify:
the coordinates (X,Y) of the center of the filter, in pixels:
the filter may be placed anywhere in direct space. The origin of the image in
real space is at the upper left side of the image.
the eccentricity.
the angle ß between its great axis and the horizontal
axis (Ox).
the shape of its profile.
Rectangular direct filters :
Rectangular filters are designed to level opposite edges in an image to avoid
artefacts in the numerical Fourier transform which assumes that the visible
image, in real space, is a period of an infinite periodic image. It allows to select (
or suppress ) a rectangular area of the direct image defined by:
(X1,Y1): coordonates of the upper left corner of the selectedarea,
in pixels.
(X2,Y2): coordonates of the low right corner of the selected
area, in pixels.
the width of the smoothed transition at the edges,
defined in pixels: the edges of the filter may be designed with smoothed transitions
to avoid Gibbs effects; the "band width" parameter represents the width of
the transition from 0 to 1, perpendicularly to the filter edge.
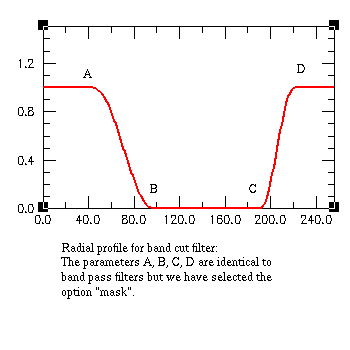
Window/mask parameter: if you select the option "window"
the filter is transparent inside the rectangular area and opaque outside;
if you select the option "mask" it is the reverse.
The button "Reset parameters" sets automatically the parameters to build a
rectangular filter to smooth the edges of the image. This is very useful to
obtain a clean Fourier transform of the image.
Introduction
II. Example of treatment using Triton
III. Installing Triton
.<p>
<IMG SRC=redball.gif>the angle ß between the great axis and the horizontal axis (Ox): -90deg.
<ß< +90deg..<p>
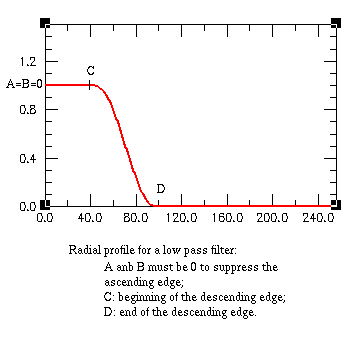
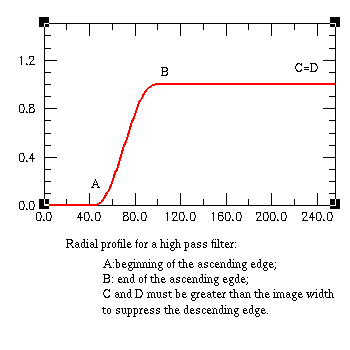
<IMG SRC=redball.gif>the shape of its radial profile: one may build low-pass, high-pass, band-pass
filters. The profile along the semi-great axis of the filter is defined by the
beginning A and the end B of the ascending edge, and the beginning C and the
end D of the descending edge. To suppress the ascending edge ( as for low-pass
filters), A and B must be set to 0. To suppress the descending edge ( as for high-pass
filters) C and D must be higher than the size of the image. Last, in any cases
one must check that 0 <= A <= B <= C <= D.<p>
<IMG SRC=redball.gif>the )